I am considering installing a Dyneema Inner forestay on Stormsvale. This will thengive me the option to install a storm jib..e.g a stormbag. The deck fitting should be straight forward. I plan to use a SS 90 degree angle iron under the deck at the forward bulkhead. Bolted to the bulkhead and glassed into the deck. A tab welded on the angle iron will come through the deck and serve as the attachment for the stay... I will have to add blocks to stretch the dyneema as well as have an eye for the tack. Now for the mast head fitting. I do not have anywhere at the mast head to attach the top of the shroud. I was thinking of a SS saddle like fitting to be bolted through the mast trans not longitudinal bolt. Of course the inner stay needs to run parallel to forestay so a bit of calculating needs to be done to find out how far down the mast the fitting should be.
Thoughts.. Examples. Pictures.
Mike
Here some suggestions
An angle bar below deck against the fwd side of the bulkhead is a good way, but the deck is probably of sandwich construction here, and needs hard inserts. There is no need to glass in the angle bar provided it fits snugly against the deck. The deck fitting could be a Wichard double folding padeye bolted through the deck and angle bar. Lies flat on the deck when not in use.
The mast fitting could be an internal tang as found on www.rigrite.com, and you can either use an external halyard block, or a sheave box below the tang.
THANKS!!! as always an elegant concise solution!! The only question is the hard inserts. Would a 1/4 inch thick SS 90% angle with 4 cm wide arms running from port to starboard, bolted to the bulkhead along its length and butted up against the deck be enough?
Mike
The hard inserts could be 10 mm dia plugs of scrap GRP laminate drilled in from the underside through the foam so they rest against the underside of the upper skin, thickness to be flush with the underside of the lower skin. Spacing 3", number depending on angle bar length.
If there is an opening in the bulkhead you should not count on the part above the opening to carry load, and then the suggested angle bar is likely to be too weak. How wide is the opening, and how much height between its upper edge and the deck?
For a hard weather jib you should use a SWL of 1200 kg for all components.
Tensioning the jibstay will make the mast bend, but this is counteracted by the mainsail when on the wind. Assume you do not have runners.
Best regards
Lars
very interesting topic as I have considered similar approach with storm jib. Does it make any difference to mainsail counteraction or stress on the mast if trysail is used instead of (reefed) mainsail?
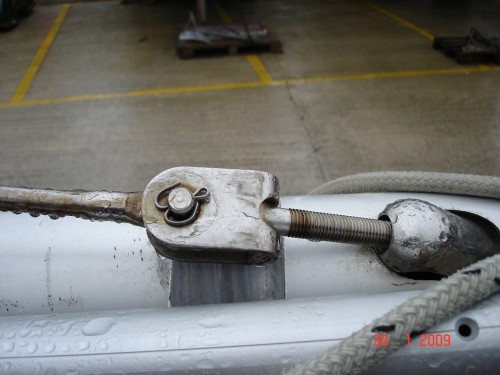
Attached a picture of the jib stay attachment on Trinket. I inherited this. I would be interested in the professor's comment. It seems pretty much foolproof, and does not rely on pop rivets, just the jamming action of the fitting in the mast.
Teemu
Ideally the top of the reefed mainsail or trysail should be at the same height as the jibstay attachment.
The mainsail reef locations determine how close the top can be.
The trysail usually has a strop at the tack, allowing height adjustment, but if there is a separate trysail track the length may limit how high up the trysail top can go.
Kind regards
Lars
Dear Cosmo
This is not an original fitting. It is a easy way of attaching a stay, but has some limitations in long-term use.
The mast cut-out contact surface taking the load from the fitting needs to be big enough, otherwise there will be deformation to the cut-out edge. Mast wall thickness is rather important here.
There is a ball inside the cup, and this arrangement is supposed to take care of the toggling action. When this is needed the most at high loads it does not work well, and the threaded part is subject to bending loads. The thread should be inspected for cracking where it exits the ball. The thread must be locked in a reliable way, otherwise it will unscrew itself.
Kind regards
Lars
Looks like we have opened another good discussion.
Anyway, I have not got the dimensions at the moment as the boat is in the US and I am back in Denmark. I will look at another 40 hopefully on the weekend and get the measurements for you.. The door opening in the bulkhead is quite large relative to the total size. I think the total bulkhead width is on the order of a meter with the door taking up about 70 cm. the space between the top of the door and the bottom of the deck is on the order of 10 cm.. not much space.
You are right I do not have runners. Hopefully this will not create a problem. The mast head fitting should be within 2 meters of the mast head probably less. I will not be going for a large storm Jib probably on the order or 6 or 8 m2. I am thinking 6...for offshore work.
Anyway Based on you comments and the fittings required this seems like a pretty easy task... he says naively. Should take between 4 hours and 3 weeks (;-)
As usual time for a rethink. I love puzzles!! There is not enough room to do this forward of the forward bulkhead. My anchor windlass motor is too close to the bulkhead. Not to mention the bulkhead door is huge and there is very little area above the door on the bulkhead to attach the SS angle iron. So I will need to come back into the V berth.
A question more for knowledge ( or another option) than anything else. We have a triangular fitting (which has an eye one can put in it) on the deck between the forward hatch and the bow. It has 4 bolts going into the deck which I believe are attached to nuts in the deck. I think this area is not cored and assume that this area is well reinforced. Do you have any idea what sort of loads this is able to withstand? Do others use this as an attachment for a storm jib stay? If so this may work but it is I believe a little too close to the mast.
Mike
One more piece for your puzzle
Is the deck fitting you mention shown on the deck drawing? Then it is in the middle of a rather large panel, meaning there will be considerable flexing, even if the attachment probably is strong enough.
It would be possible to use the strong lower tip of the forward bulkhead as an anchor point for a tie rod to the deck fitting. The tie rod could be of wire and removable in order not to disturb ordinary use of the fwd cabin
Kind regards
Lars
Yes, it is the fitting in the deck drawing. So the plan (solution to the puzzle) now is as you suggest. A wire attached to the bottom of the forward bulkhead with a stainless steel backing plate. I will drill through the holes in the deck fitting and attach a fitting to longer bolts to which the wire will attach. I will use a turnbuckle to tension the wire..
Mike
A turnbuckle is not needed on the removable wire if you make the length to fit, slight elongation under load is allowed. In case you want some pre-tension you could put your heaviest crew to stand on the deck above the fitting when connecting the wire.
5/16" 1x19 suggested.
Best regards
Lars