Do you want to be informed on new Posts on this Thread? (members only)
| S&S Swan Maintenance - 43 Rudder Re-fit |
|---|
|
Join Date: 15 April 2011
Posts: 393 |
||
|---|---|---|
|
43 Rudder Re-fit All, With the help of Lars and Hiro, along with Hiro's information in the maintenance section, my two sons and I successfully removed the rudder from my new boat - hull 003. It appears that significant internal structural changes, as well as the obvious external changes, have been made which have presented me with a puzzle. Attached are 4 pictures: one is the full rudder; one is a ground down section above the shoe where I expected to find a steel strap but was presented with fiberglass; and two show what appear to be keyways - one at the top of the rudder and one just above the shoe. Question: if these are keyways, will I be able, theoretically anyway, to remove the rudder shaft, and then the shoe, to replace the bushing? If not, does it make sense to cut ouf the entire rudder shaft assembly and start over? First step is to visit a machine shop and see if they can help. Chris 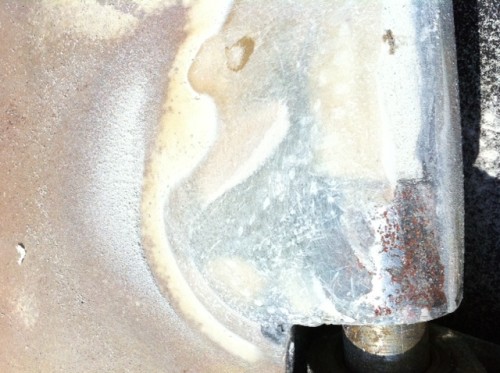 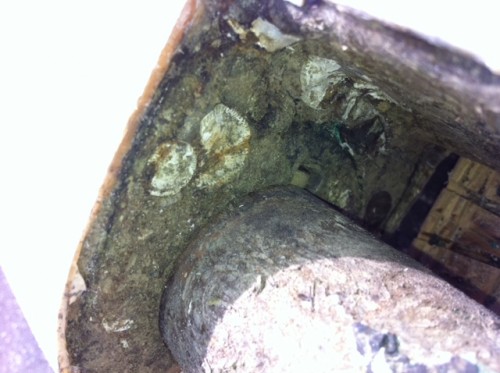  |
|
Join Date: 15 April 2011
Posts: 393 |
||
|---|---|---|
|
Forum Members,
I heard back from the Professor, Lars Strom, who suggested a very simple and effective way to extract the shoe. If I understand him correctly, and I have a qualifying email enroute to him now, he suggested that I cut the leading edge of the rudder below the hinge, which I interpret as the area below the shoe, so that the shoe can be extracted. Since the leading edge here does not support the shoe, when fitted to the boat, I should be able to rebuild this section without too much concern about structural integrity. This is not to say that I won't pay close attention and do my best, but it does ease my mind a little. Bottom line, with this approach, I should have the rudder back on in about a week! This assumes that I can find an adequate bushing. I plan to contact the company listed by Hiro in the maintenance section. Chris |
|
Join Date: 15 April 2011
Posts: 393 |
||
|---|---|---|
|
I successfully cut off a small section of the leading edge just below the hinge which allowed me to remove the entire shoe fitting. I can now purchase and fit a new bushing. I use a 7/8 inch hole saw yesterday to take samples of the core at the top, middle and bottom. The middle and top are saturated; the top appears dry but is powdery, which suggests that it too has been saturated with water at some point. I think I will need to cut off one entire skin and replace all core material. Here is my initial plan to do this: determine if the steel straps are still in place by drilling through the glass; if so, then removing all glass around the straps so that I can remove the rudder stock assembly from the rudder. At this point, I will cut around the entire edge of the rudder and try to remove one half. My concern is that the rudder "log" is glassed in and I will now be forced to cut off a significant portion of the rudder. Without plans, it will be difficult for me to rebuild the rudder to it's current shape. I will keep you all posted! |
|
Join Date: 20 February 2007
Posts: 119 |
||
|---|---|---|
|
Chris: Congratulations on all of your efforts. It is good to see there are other owners out there besides myself who are doing this sort of work on their boats. I see from your pictures that your rudder has been modified to be more deeper and eliptical than the original design. I think I can also see from your pictures the faint outline of the lower strap immediately above where the shoe was. The strap wraps around the rudder stock so I am pretty sure if you were to look aft of this area you will find the strap securing the blade. The same would be true near the top of the rudder. This assumes you are still thinking about removing the rudder stock from the rudder blade but since you got the shoe off you probably do not need to do this. Does your 43 still have it's trim tab? Hiro |
|
Join Date: 15 April 2011
Posts: 393 |
||
|---|---|---|
|
Hi Hiro, I agree, the rudder straps are likely still there, below all of the fiberglass. If I proceed, rather than the first step listed above, I will likely make templates of the current rudder so that I can build it back to its current shape and size. Although I could get the new bushing and put the shoe back in right away, since the rudder is so saturated and very heavy, I really need to peel a skin and cut out all of the core material. I just spoke with a man named Mark Reuer of Reuer boat works, a true gentleman, who said he would charge $55/hr time and materials and expects the cost to be $3000. I think this is a fair price, but he cannot do it until July. I also think that since I have come this far, that I, with the help of my sons, should finish the job. This job is the only one that has the potential to keep us from sailing for a while. Seacocks are ready to go in - one already mounted - and I expect that they will all be in next trip. A little engine work and we're on our way! Do I sound like an optimist? Thanks for your kind words and continued support. I have big plans for this boat but would like to sail her for a while before jumping into any huge projects. BTW, how did you measure for the new bushing? Digital caliper? Chris |
|
Join Date: 15 April 2011
Posts: 393 |
||
|---|---|---|
|
Hi Hiro, I forgot to answer your question about the trim tab. Yes, it is there. Two steel plates with through bolts hold it in place. These can easily be removed. I do not, however, have the inner wheels at the steering station. I need to find these. IF you know of someone who has fixed the trim tab and no longer has use for them, I would be very grateful to get a contact. I would love to get the trim tab back into operation. Chris |
|
Join Date: 20 February 2007
Posts: 119 |
||
|---|---|---|
|
Chris:
Yes I measured the rudder stock and shoe with a digital caliper. You will undoubtably find some wear and eccentricity on the rudder stock but keep in mid that the rudder stock never has to rotate more than 90-100 degrees. Before I repaired the rudder bushing there was enough wear on my stock that in very heavy air in a following sea I would hear an occassional thunk from the lower rudder area. Have not heard it since I did the repair and I have been in some heavy seas since then. I will keep an eye out for trim tab stuff for you. Do you still have the original steering pedestal and the clutch inside next to the chain cog on the steering wheel shaft? Hiro |
|
Join Date: 15 April 2011
Posts: 393 |
||
|---|---|---|
|
Hi Hiro, I have the original pedestal but only one wheel. Not sure about the clutch - is that the third wheel I have seen in pictures or are you refering to a hidden clutch? It appears that two tangs just forward of the fuel tank were set in place to hold a sheave, which I suspect is part of the mechanism that allows the helm to adjust the trim tab. I would have thought there would be three tangs for 2 sheaves, but I have not thught too hard about this yet. Thanks
Chris |
|
Join Date: 20 February 2007
Posts: 119 |
||
|---|---|---|
|
Chris:
The third (smallest) wheel is the clutch adjustment wheel. If you were to open the top of the pedestal you will see the actual shaft that the three wheels attach to suported by bushings at either end of the pedestal. In the middle of the shaft you should see two flat disc/plates adjacent to the chain cog for the steering cables. The tabs for the sheaves near the fuel tank are indeed for the trim tabs. There should be another set below the nav station and sink area as well. Regards, Hiro |
|
Join Date: 15 April 2011
Posts: 393 |
||
|---|---|---|
|
Hi Hiro, Thank you for you explanation - I will look for the tangs by the nav station and under the sink. Right now, I have decided to cut my rudder open long ways, clean out all of the bad core material and then try to put it back together. To make things more imperitive that I do this now, when I lifted the rudder by the rudder post at one end and rudder (with help!) the rudder post twisted and moved longitudinally. This should not happen. So, I need to make some progress this weekend on this project. I am still trying to track down the celcon acetal polymer for the bushing - if you have a contact I would be much obliged to know who that is and any specifics that could help me order the bushing. Thanks again, Chris |
|
Join Date: 20 February 2007
Posts: 119 |
||
|---|---|---|
|
Chris:
Based on my notes the bearing was a Gar-Max #GM-4448 which has a ID of 2.75" and an OD of 3". I would double check your dimensions to be sure however. The bearings were purchased from BDI. Their web site is http://www.bdi-usa.com/ and they have locations in the PA area. Good Luck. Hiro |
|
Join Date: 15 April 2011
Posts: 393 |
||
|---|---|---|
|
Hi Hiro, I have a call in to BDI - they are researching whether they have the correct size bearing for me. My machine shop says 40mm ID and 50mm OD - which is quite a bit different from yours. We will see! Another question for you: when you installed your rudder, did the bottom of the shaft ride on the bottom of the shoe hinge? Did you fit a plastic washer? And if you did place a washer here, where did you get that? Thanks again for all your help. Chris |
|
Join Date: 20 February 2007
Posts: 119 |
||
|---|---|---|
|
Chris: Your shaft dimensions may be more correct than mine. I had my rigger get me the bearings so his notes may be off. As far as I remember the weight of the rudder stock is supported by the bronze shoe. When I initially took off the bronze shoe I seem to recall a very thin polymer disc at the bottom of the shoe and I do not know if it was one piece along with the bushing or not. When I removed the old bushing the disc was separate from the bushing. I re-installed the rudder assembly without this disc since the lower hinge/strap appeared to rest on top of the shoe flange and the rudder stock did not seem to bottom out. This was confirmed by the fact that I did not see any wear on the disc or the bottom of the rudder stock. Since your rudder is a modified unit you should make a careful inspection of any wear marks on the bottom of the rudder stock and inside the bronze shoe and make a determination. A source for suitable bearing sheet material would be at McMaster-Carr. You can google them for a web site. I am off to Italy tomorrow to visit Matteo and the Classic S&S Swan Rendezvous at Elbe Island so may not be able to pick up emails immediately. but will try to keep in touch. I am scheduled to race aboard another Swan 43 there so am planning to take notes on what I see aboard their Swan 43. Sound like you have it under control, Good Luck. Regards, Hiro
|
|
Join Date: 15 April 2011
Posts: 393 |
||
|---|---|---|
|
Hi Hiro, Thank you for the informative reply! And good luck in your race! The bottom of my rudder stock is basically new and shiny but I suspect it should be resting on the bottom of the shoe. If not, wouldn't the weight be taken up by the quadrant and the bottom of the rudder assembly which does not seem to be the best solution. I think another question to the professor is in order! Have a great time in Italy and please sent my regards to Matteo! BTW, if you feel inclined, you may mention to him that we have decided upon "Mabel's Casse Tete" for the name of our boat. This weekend, I am off to finish installing through-hulls/seacocks and to fill two machined holes left from through-hulls no longer needed! With warm regards, Chris |
|
Join Date: 02 January 2008
Posts: 1547 |
||
|---|---|---|
|
Dear Hiro and Chris
|
|
Join Date: 15 April 2011
Posts: 393 |
||
|---|---|---|
|
Dear Professor, Thank you for your reply. After our previous correspondences, this makes sense to me. In my case, since the bosses became loose, I believe that the rudder stock was not resting on the bottomof the shoe (no visible washer) and instead that the rudder was resting on the top of the hinge/shoe. This will be corrected soon. On a separate note, it appears that finding a busing to fit my hinge and stock - 40/50mm - from the bearing company recommended by Hiro, and others companies, is difficult. Apparently we only stock SAE here, not metric, and it will be a 6 week order. I don't think I will wait for that. I will continue to look for celcon rod stock, or other acetal copolymer stock, which can be milled by the machine shop. This would also provide the washer, but I am not that hopeful right now. I will keep you apprised of my progress. Chris |
|
Join Date: 15 April 2011
Posts: 393 |
||
|---|---|---|
|
All, Rudder update: After finally detatching the rudder stock from the rudder, and attempting to split the rudder to remove the water-logged foam core, it became clear to me that building a new rudder from scratch would be the best course. Why, you ask? Two primary reasons: the design is not original and, although it appears to be a decent design, I have no idea how it came about; the rudder was constructed with a steel plate in the center which made the process of cutting it down the center virtually impossible - believe me, I tried! So, under the direction of the professor, I will be building a brand new rudder from scratch. No pictures yet, but they will follow. I plan to use Coosa structural closed-cell foam for the core, 17 oz. biaxial glasss and West System epoxy. I hope to prepare a set of pictures and a write-up for the maintenance section - Hiro, through many emails and his excellent description in the maintenance section, has been extremely helpful. Chris |
- Threads : 1702
- Posts : 10217
- Members: 821
- Online Members: 2