Do you want to be informed on new Posts on this Thread? (members only)
| Keel Bolts and General Topics on Keel - Two small keelbox cracks |
|---|
|
Join Date: 27 September 2012
Posts: 38 |
||
|---|---|---|
|
Two small keelbox cracks 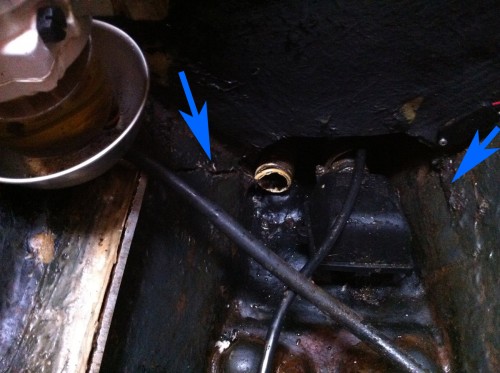 |
|
Join Date: 02 January 2008
Posts: 1547 |
||
|---|---|---|
|
Dear Ice |
|
Join Date: 27 September 2012
Posts: 38 |
||
|---|---|---|
|
Hi Lars,
 |
|
Join Date: 27 September 2012
Posts: 38 |
||
|---|---|---|
|
On saterday i will make a picture with a keel attachement overview. If you need more pictures just let me know. |
|
Join Date: 02 January 2008
Posts: 1547 |
||
|---|---|---|
|
Dear Ice |
|
Join Date: 28 July 2008
Posts: 79 |
||
|---|---|---|
|
We had similar cracks on or Swan. Long story but... Worth investigating the cause thoroughly to understand what type of reapir is needed. Are these the only cracks; eg are there any fwd for the keel sump, any on the aft side of the transverse stringer they are on? Are they new/old? I found with ours cracks that they were really just a sympton of something else. I would recommend a bit more investigative work. Cheers Adrian
|
|
Join Date: 27 September 2012
Posts: 38 |
||
|---|---|---|
|
Hi Adrian,
|
|
Join Date: 01 March 2007
Posts: 147 |
||
|---|---|---|
|
Dear Ice, I had cracks develop in the area of the aft most keel bolt on my 47 Sarabande. For a few years I experimented with topical repairs, but last year I removed the keel which exposed the problem. If you are talking about the single aft most keel bolt, it joins the hull in a narrow area, largely filled with filler with poor lateral support. This bolt is twice the length of all of the other bolts. Therefore it has more leverage, and able to compromise this section of the join! I have good photos if of help! Best regards, Rob. Sarabande 47/029 |
|
Join Date: 27 September 2012
Posts: 38 |
||
|---|---|---|
|
Thnx Robmably for the comment.
|
|
Join Date: 20 March 2011
Posts: 88 |
||
|---|---|---|
|
 |
|
Join Date: 01 March 2007
Posts: 147 |
||
|---|---|---|
|
Dear Ice,
  |
|
Join Date: 23 October 2011
Posts: 150 |
||
|---|---|---|
|
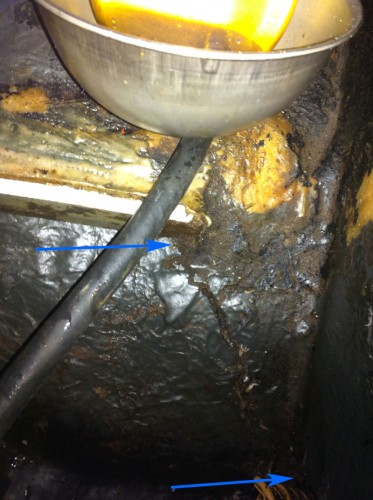
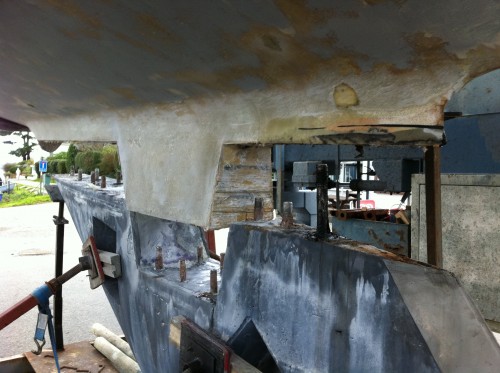
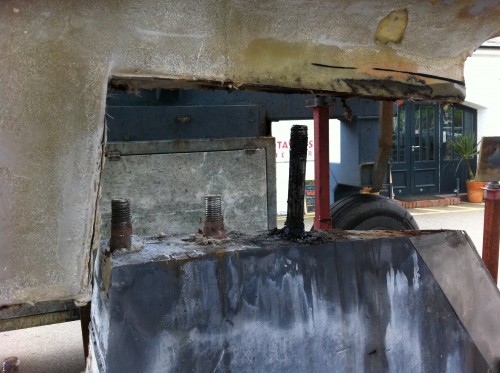
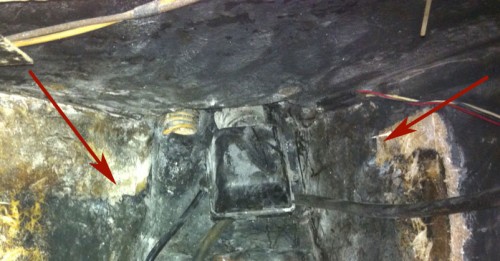
Dear Ice, Here are a couple of pictures showing the aft most keel bolt which is longer than all the rest and is NOT bolted through the matrix which forms the bilge box. The narrowness of the hull and keel at this point makes it difficult to strengthen. We removed all the cracked areas of the hull, refilled the deep narrow section and fabricated a steel plate which was faired to fit the internal shape of the hull. Rob. Sarabande. Dear Rob, your pictures are quite interesting, it is for me the first time I can see the keel of the 47' disassembled, thank you |
|
Join Date: 02 January 2008
Posts: 1547 |
||
|---|---|---|
|
Dear Matteo |
|
Join Date: 01 March 2007
Posts: 147 |
||
|---|---|---|
|
Dear Matteo,
|
|
Join Date: 27 September 2012
Posts: 38 |
||
|---|---|---|
|
Hi Robmably,
|
|
Join Date: 01 March 2007
Posts: 147 |
||
|---|---|---|
|
Hi Ice,
|
|
Join Date: 27 September 2012
Posts: 38 |
||
|---|---|---|
|
Hi all,
 |
|
Join Date: 23 October 2011
Posts: 150 |
||
|---|---|---|
|
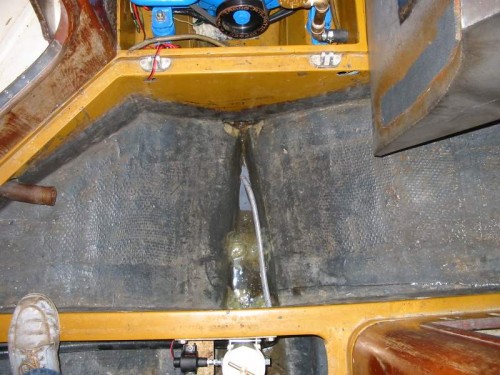
Dear Matteo, Yes your numbers are correct. The section aft of the keel box reduces in width very quickly, hence single bolts as opposed the pairs in the wider sections. The aftmost bolt is the most accessible of all of them on my 47'. It is situated just forward of the athwartship stringer supporting the cabin sole at the base of the steps. As aforementioned, it is the only keel bolt which does not go through a steel matrix - it is simply through fiberglass only. The steel matrix which forms the keel box extends forward and in turn bolts go through the frame which forms the heel of the mast. Aft of the keelbox it stops short of this final longer bolt. My theory is that there is excessive leverage from the keel at this point and with the longer shank of the bolts, the through hole (largely fiberglass filler) gets stretched easily, and in my case cracks developed from there and extended toward the keelbox, similar to the pictures posted by Ice. The bolt itself was absolutely fine - as were all the others - I have not replaced any of them. Rob. Sarabande Dear Rob,thank you. It looks like this bolt is positioned under the container of the main set of batteries. |
|
Join Date: 02 January 2008
Posts: 1547 |
||
|---|---|---|
|
Dear Matteo and Rob |
|
Join Date: 23 October 2011
Posts: 150 |
||
|---|---|---|
|
Dear Lars, thank you very much, it is great to know that one single 30 mm bolt can carry the total weight of the keel!! |
|
Join Date: 23 October 2011
Posts: 150 |
||
|---|---|---|
|
here is the link of the profile plan of the 47' where it is possible to see the location of the deep bilge: |
- Threads : 1701
- Posts : 10215
- Members: 820
- Online Members: 0