Do you want to be informed on new Posts on this Thread? (members only)
| S&S Swan Maintenance - Loose rudder on S&S 40 |
|---|
|
Join Date: 31 July 2007
Posts: 88 |
||
|---|---|---|
|
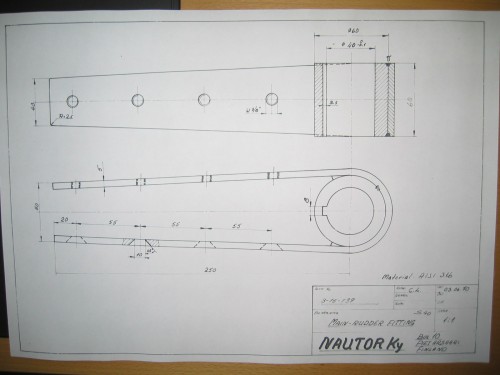
Loose rudder on S&S 40 Last year when I hauled out, I observed that the rudder is loose on the shaft. It moves from side to side about 12 mm measured at the end of the blade. The play comes from the keys being loose on the rudder stock. The rudder stock is a solid shaft 40 mm diameter from the cockpit down to the lower bearing that is attached to the skeg and takes the downward load. There are two straps, 60 mm wide and 250 mm long that hold the rudder blade. The straps wrap around a sleeve. The rudder stock goes thru the sleeve. There is a 8 mm key that transmits the turning force from the shaft to the rudder. Because there are two straps, I assume there are two keys, one in each sleeve. The looseness is between the shaft and the sleeves. This year, when I hauled out, there was no increase in looseness; it was the same, but I have not used the boat either. In the past, when I did build rudders, I would bend the shaft about 45? about 5 inches from where it comes out of the hull and machine a flat on the end of the bend, so that I could taper the rudder. When it was embedded into the rudder blade, it became a solid assembly. With this key arrangement, there must have been some clearance initially to assemble it. Over the years the play is probably increasing, or maybe, I never noticed it before. Your suggestions/comments are invited please!
 |
|
Join Date: 20 February 2007
Posts: 119 |
||
|---|---|---|
|
I had the same identical issue on my 1969 Swan 43. The keyway on the rudder stock and key develop wear over time and results in the rudder movement. I suspect this was a very tight pressure fit initially at the factory but over time it develops slop. I made repairs by welding the strap bushings directly to the rudder shaft. Don't forget to inspect the lower bearing on the bottom of the rudder skeg. This can also develop wear and induce lateral (side-to-side) play of the rudder stock. It appears that all of the older Swans are exhibiting this issue. See forum discussions dated February 20, 2007 and March 19, 2007 for pictures and discussions. H. Nakajima
|
|
Join Date: 31 July 2007
Posts: 88 |
||
|---|---|---|
|
Dear Nakajima-san: I have heard of such a repair from another owner of a S&S43. His name is Robert Ahabel. The repair was done in Sausalito, CA but I can not find out exactly how it was done because a shipyard did it. You are quite possibly right that it is a condition that affects these models and it becomes worse as time goes on. Did you remove the entire rudder assembly from the boat and then remove the rudder blade? Did you experience distortion from the welding? Did you stick-weld or heli-arc TIG weld? Did you passivate the assembly after welding? Did you find corrosion? How long did it take you? The answer to that question determines what kind of arrangements I have to make to keep the boat out of the water. Thank you very much for sharing your knowledge!
|
|
Join Date: 20 February 2007
Posts: 119 |
||
|---|---|---|
|
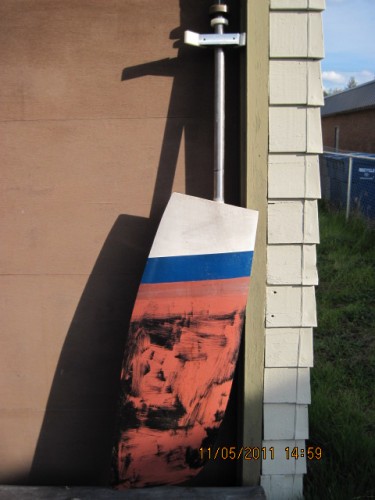
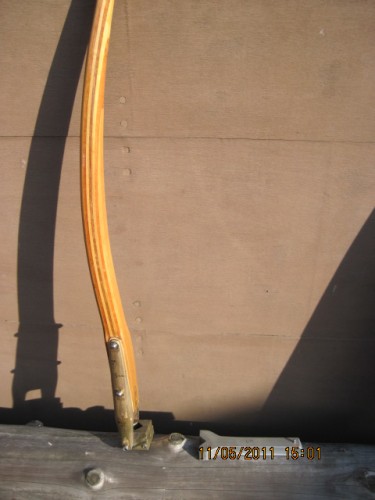
Dear Mr. Lange or Lange-san: I performed the rudder repair work myself except for the welding component and can say that the repair is very straight forward and can be done in about 5-7 days time. To properly weld the strap bushings to the rudder stock the entire rudder assembly should be removed from the boat. Removal of the rudder assembly goes quite quickly. First remove the rudder quadrant and loosen the rudder stuffing box. Next grind away the fiberglass fairing at the bottom tip of the skeg to expose the cast bronze shoe which supports the bottom of the rudder stock. Remove the 4-5 bolts securing the bronze shoe to the fiberglass skeg. You may need to heat up this shoe with a hand held torch to release any epoxy used to secure the bronze shoe to the skeg. Be very gentle here not to heat distort or hammer distort this shoe since this is a custom Swan casting and not overly robust. Once the bronze shoe has been freed the entire rudder assembly should slip out. Have a helper here since my rudder assembly weighed about 90 pounds. Once the rudder assembly is off the boat remove the stainless steel shrouds covering the stainless steel rudder stock along the leading edge of the rudder blade. Next grind away the fiberglass fairing to expose the stainless steel straps holding the fiberglass rudder blade. Remove the stainless steel bolts from the strapping and the fiberglass rudder blade should separate from the strapping. Clean the stainless steel rudder stock, strapping, etc with a wire brush wheel on a grinder. You will probably see numerous areas of crevice corrosion and pitting. The factory rudder stock is 40mm and I concluded that this is a very conservative design and unless I saw an obvious area of concern the shaft, although not pretty, was structurally OK for another 37 years. Also one should keep in mind that unlike contemporary spade rudder designs the older Swans have skeg hung rudders where the bottom of the rudder stock is supported by a bottom shoe and at the top so dynamic loads are supported at two locations. I had my local rigging shop perform a TIG weld to continuously weld the top and bottom faces of both the upper and lower strap bushings. The welds were then ground smooth. Before you have the bushings welded double check their alignment and location with the rudder blade. I had to re-weld one of my bushings due to a slight mis-alignment. Passivating would not hurt but I did not have enough time so I did not do this. Re-assembly is reverse of dis-assembly. Make sure to replace all stainless steel bolts with new. Per Swan factory technical director?s direction all bolts should be torqued into place using a wrench on a double nut arrangement. Using a screw driver is totally inadequate. I also replaced the bushing/bearing in the cast bronze shoe with a composite unit from this web-site http://www.garlockbearings.com. Again per Swan factory technical director?s comments do not use Teflon since this will expand when in contact with water and may cause binding and also not to use any graphite type material against stainless steel as this may promote crevice corrosion. The time consuming component for me was the re-fairing of the rudder blade at the straps, shrouding of the rudder stock and the cast bronze shoe. I am pretty finicky about these and it took multiple applications over a course of 3-4 days to achieve satisfactory results. I have attached photos for your info. Good luck. Happy to answer any questions. Hiro 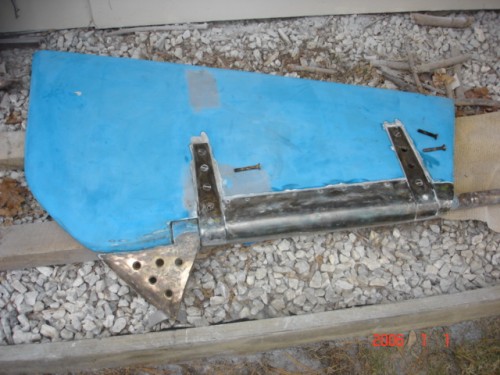 |
|
Join Date: 31 July 2007
Posts: 88 |
||
|---|---|---|
|
Thank you Hiro for your detailed reply and instructions. That is exactly what I had hoped for. Someone who has done the job and taken pictures like you did. It will make it so much easier for me. Thank you! Pete |
|
Join Date: 31 July 2007
Posts: 88 |
||
|---|---|---|
|
Thank you Hiro for your detailed reply and instructions. That is exactly what I had hoped for. Someone who has done the job and taken pictures like you did. It will make it so much easier for me. Thank you! Pete Dear Nakajima-san:
|
|
Join Date: 02 January 2008
Posts: 1547 |
||
|---|---|---|
|
Pete and Hiro |
|
Join Date: 31 July 2007
Posts: 88 |
||
|---|---|---|
|
Dear Professor Lars:
|
|
Join Date: 02 January 2008
Posts: 1547 |
||
|---|---|---|
|
Pete |
|
Join Date: 31 July 2007
Posts: 88 |
||
|---|---|---|
|
Dear Lars:
  |
- Threads : 1702
- Posts : 10217
- Members: 820
- Online Members: 0