Do you want to be informed on new Posts on this Thread? (members only)
| S&S Swan Maintenance - Portlight renovation |
|---|
|
Join Date: 15 April 2011
Posts: 393 |
||
|---|---|---|
|
Portlight renovation Dear All, I had originally thought I would throw out the portlights on my boat and replace with new. Recently, I have been inspecting them more closely and would like some input about this job. I have attached 2 pictures: the first is one portlight taken apart and in a jumble - the key here is that someone painted portions of the portlight with an epoxy paint; the second shows two sections of two portlights, one was first cleaned using a glass beading machine and the other just scrubbed with soapy water and 3 grades of 3M pads. Both portlights are pitted. And although I can get them to shine with 3M pads and metal polish, I cannot easily remove the pitting. Any thoughts about this project? I guess I could start with sand paper and remove all of the pitting and then move up to 3M pads before having them anodized. I could possibly replace them, I belive they are original, and here in the U.S. it's not easy to find Goiot portlights. And with the strong dollar, if I do replace them, I would prefer to pay in USD and have them shipped. Finally, I could just replace with U.S. based NFM SS portlights and do some glass work in the cockpit. Fair Winds, Chris Mabel's Casse Tete 43/003 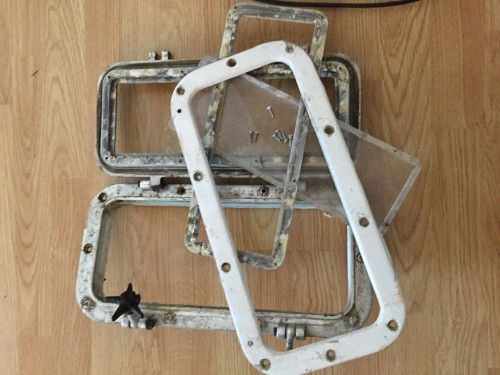 A jumble of parts from one 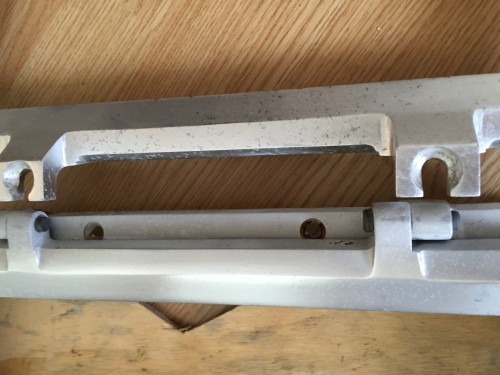 After scrubbing with 3 grades of 3M pads |
|
Join Date: 15 April 2011
Posts: 393 |
||
|---|---|---|
|
Dear All, In the bottom picture, the lower portion shown was first cleaned in a glass beading machine. It's hard to tell, but the top portion in the same picture is actually shiny. But the pitting is clearly shoing through. Fair Winds, Chris Mabel's Casse Tete 43/003 |
|
Join Date: 02 February 2007
Posts: 126 |
||
|---|---|---|
|
Dear All, In the bottom picture, the lower portion shown was first cleaned in a glass beading machine. It's hard to tell, but the top portion in the same picture is actually shiny. But the pitting is clearly shoing through. Fair Winds, Chris Mabel's Casse Tete 43/003 Chris, I faced the same problem on Tigris. Unfortunately we had 11 of these portlights round the outside of the cabin and also 2 into the cockpit. Ours are recessed and in order to keep it original we found a company remaking the portlights in Italy using the casts from Goiot. They were expensive, and in our case fitting them was a challenge as they had to be carved out of the coachroof which then had to be filled and painted. In my case a reason for change after 34 years was the piece that presses onto the rubber seal was corroded which meant that they had to be over tighned to stay waterproof. My experience of re coating corroded alloy isn't good either. Big job done, they look like new and should be good for the next 34 years!! |
|
Join Date: 15 April 2011
Posts: 393 |
||
|---|---|---|
|
Dear Gavin, Thank you for your reply. Glad to hear that you were able to get the job done and that you're happy with the results. I have a lot of glass work to do in my cockpit so, if after hearing back from others here and when my research is complete, I decide that I cannot make them look and act as new or close to it, I wil likely buy similar. I understand that anodizing does not fill in any way and basically what you see is what you get. That means that I need to get these portlights looking as good as I want before taking them to the refinisher. One final note; I'm amazed that after almost 50 years they are still in goo condition with the minor pitting showed. Chris Mabel's Casse Tete 43/003 |
|
Join Date: 20 March 2011
Posts: 88 |
||
|---|---|---|
|
Hi Chris I have a pair of similar portlights on Hatha, in poor condition, and was unable to find anything new that was the right size. I think you will be much better off if you were to replace yours with new, but here is what I did. A plating/ polishing service that I was using at the time suggested that they be sent to a welder, who filled all of the pitting with silver solder. They were then sent for chrome plating, and the bright chrome surface was lightly sanded to a satin sheen. They looked great at first, and still look good 3 years later, but the chrome plating is beginning to peel at corners. I am not sure if this is because the whole process is flawed, or if the workmanship at the plating shop was not up to par. As I indicated I am no longer using this plating shop, this is not the outfit I recommended in an earlier post. When mine get bad enough in a couple of years or so, I plan on consulting with Classic Components and maybe have the portlights stripped and give it another try, unless you or somebody else comes up with a better solution. I'd be interested to hear from anybody who has technical knowledge of the process I described, or any other solution. The plastic knobs and gaskets were readily available from Goiot at that time. Good Luck! Tonyh |
|
Join Date: 29 January 2007
Posts: 1019 |
||
|---|---|---|
|
Dear Friends, Tony's solution sounds very interesting. Could you post some pics? Gavin, I have exactly the same problem you had on Tigris' portlights, and would be very interested to know which is the Italian company, maybe in a short time I will be forced to follow the same route! Thanks, and fair winds! matteo (47/069 Vanessa) |
|
Join Date: 15 April 2011
Posts: 393 |
||
|---|---|---|
|
Dear Tony, Thank you. I too would like to see pictures if you have any. You suggested that new would be better; do you have a company in mind? New is good, for sure! The Professor provided a good solution. He suggested that I could paint the portlights with aluminum colored paint. And just as a professional auto body shop does, primer and filler could be used in the process to fill the pitting before the final coat is applied. I think, if a good job were done, this could be a very effective solution. I have been researching aluminum polishing and think this may have merit too. To be effective, all paint and sealants need to first be removed and then the portlights should be uniformly cleaned in the glass beading machine. Once this is accomplished, the portlights will be sanded to remove all pitting and then using successively finer grades, polished. Then, if they look good, anodized. Further thoughts or comments welcomed. Chris Mabel’s Casse Tete 43/003
|
|
Join Date: 20 March 2011
Posts: 88 |
||
|---|---|---|
|
Dear Matteo and Chris I will post some pics showing the Good, the Bad, and the Ugly in a couple of days. On the 44 these portlights fit on a moulded rise, so replacements need to be exactly the same. I could not find anything to fit which is why I took the path I did. Regarding paint, I have used Awlgrip Bright Aluminum followed with Clear Coat on my window frames for years, and it looks exceptionally good when new, but doesn't last very long. Seems like it needs to be re-coated every 2 or 3 years to keep it really bright. May have to do with the high content of metal particles in the paint. If the pitting on your portlights isn't too deep, polishing and re anodizing might be your best bet. You might send some high res photos to a polishing shop and ask what they think. Best, Tonyh |
|
Join Date: 30 January 2007
Posts: 461 |
||
|---|---|---|
|
Hi everybody, I am following the discussion with interest because it is a common subject that regards other alluminum parts beside the Goiot portlights. In case a substitution is no more available the best solution is, obviously, to rebuild entirely the part from a mold; unfortunately and especially if only few pieces are needed, the price can be very high. Second in the row comes the possibility to fix breaks or pits by welding. The main problem of alluminum welding stands in finding the right welding alloy; unfortunately there are so many different chemical compositions of what is commonly called alluminum that it may be difficult to find the matching one in the particular case. Only a very experienced machine shop will be able to work the problem out. Once one of the two above mentioned solution is carried out I would add that a well made anodization (for marine environment) is the perfect finish. I would not go for anything else. Having said this I have two questions for Tonih. Assuming that your portlights were made of alluminum like all ours, do you know why they decided to fill the pits with silver? And why chrome plating instead of anodization? Daniel, 411/004 Luna Menguante |
|
Join Date: 15 April 2011
Posts: 393 |
||
|---|---|---|
|
Dear Tony, Thank you. My friend at the machine shop also suggested sending the portlights out to be polished. So far, I have just been testing. BUT, I have a secret weapon - free of cheap labor from my two strong boys! They can polish the aluminum by hand. And if the pitting turns out to be too deep, I'll follow the advice of the Professor with little lost! Or, since my cockpit has been cut in so many places (is it really possible that it made sense to cut out a large opening for a shower - there must have been a better alternative) I can adjust the portlight opening when I do the cockpit restoration. More and more I am trying to bring my boat back to original where it really matters; e.g., original Lewmar traveler; no holes in the cockpit - the usual! Fair Winds, Chris Mabel's Casse Tete 43/003 |
|
Join Date: 15 April 2011
Posts: 393 |
||
|---|---|---|
|
Dear All and especially Professor, What is the preferred method to remove the press fitting at the hinge. I don't have a lot of special tools and was thinking that I couls just use a hammer and machine screw of similar diameter. Chris |
|
Join Date: 06 January 2011
Posts: 11 |
||
|---|---|---|
|
Hi Chris, I tried hammer and skrew method earlier this year but finally had to do some careful drilling. Ofcourse now I need new hinge pins. Good luck, Teemu / 43.014 |
|
Join Date: 15 April 2011
Posts: 393 |
||
|---|---|---|
|
Dear Teemu, Thank you. I had hoped to reuse 2 but I suspect that is wishfull thinking! Are they plastic covered steel? Chris |
|
Join Date: 06 January 2011
Posts: 11 |
||
|---|---|---|
|
Chris, pure plastic, perhaps nylon or similar. Teemu |
|
Join Date: 20 March 2011
Posts: 88 |
||
|---|---|---|
|
Dear All Here is the photo I promised. It shows that I will be revisiting this issue in the not to distant future. When I contact my new plating company I will re-open this thread if they offer anything encouraging, but I am not very optimistic- we'll see. In response to Daniel's questions, the silver solder was used to fill imperfections. I assume that material was chosen because it is commonly used for brazing, and is probably compatible with the aluminum, but I am assuming. I went with what was recommended by 2 "experts". Regarding re-anodizing, I have found, as Chris says, that pitted aluminum looks pretty bad when anodized, and my to portlights were in worse shape than Chris's. Daniel is also correct about welding. I have had disasters when anodizing parts that were welded with the wrong alloy rod. I replaced Hatha's toe rails, and the welding at the transom for the spinnaker lugs had to be ground out and re done- the anodizing turned the welds black. Then the rails had to be stripped and re-anodized. I would be interested in finding Gavin's source for replacements. Maybe all of our portlights are the same ones from Goiot, and they might be able to produce them more efficiently? 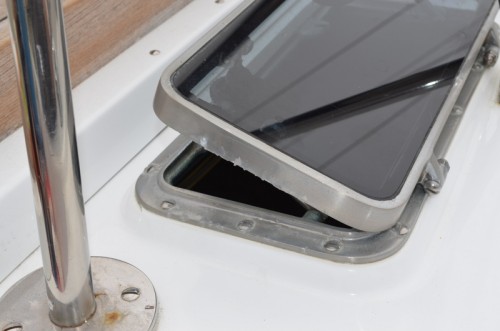 Portlight with laminated auto glass |
|
Join Date: 02 February 2007
Posts: 126 |
||
|---|---|---|
|
I am trying to find the name and details of the company that built mine. Gavin |
|
Join Date: 15 April 2011
Posts: 393 |
||
|---|---|---|
|
Tony and Gavin, It's hard to tell the size of Tony's hatch in from the picture and I suspect that it is not 7x14; if it is, check with Atkins and Hoyle. They make excellent ports and hatches, all cast aluminum and they have a "venting hatch offshore" listed. http://atkinshoyle.com/products/hatches-and-ports/xr-90-offshore-cast-hatch.html Chris Mabel's Casse Tete 43/003 |
|
Join Date: 02 March 2007
Posts: 83 |
||
|---|---|---|
|
Dear All, The swan 41 only has 2 portholes. When I removed these to paint the GRP, one of the aluminium surrounds broke. I drew the surround accurately using CAD, and got two new surrounds laser cut in 3mm mirror finish stainless. I then had to countersink the holes and put a slight bevel on the outer edge. An easy job using modern techniques. The surrounds can be seen in the attached picture. ( The teak eyebrows are my own addition to stop water running straight into the windows when they are open)
Cosmo Little
 |
|
Join Date: 15 April 2011
Posts: 393 |
||
|---|---|---|
|
Very Nice! |
|
Join Date: 23 February 2008
Posts: 15 |
||
|---|---|---|
|
Chris, I faced the same problem on Tigris. Unfortunately we had 11 of these portlights round the outside of the cabin and also 2 into the cockpit. Ours are recessed and in order to keep it original we found a company remaking the portlights in Italy using the casts from Goiot. They were expensive, and in our case fitting them was a challenge as they had to be carved out of the coachroof which then had to be filled and painted. In my case a reason for change after 34 years was the piece that presses onto the rubber seal was corroded which meant that they had to be over tighned to stay waterproof. My experience of re coating corroded alloy isn't good either. Big job done, they look like new and should be good for the next 34 years!! Hi, Gavin, Do you have the name of the company in Italy that is recreating these Gioit hatches? Ours were damaged during redecking Infidel this past winter so, like others, I've discovered there is no "off the shelf" replacement. Candy
|
|
Join Date: 02 February 2007
Posts: 126 |
||
|---|---|---|
|
I got it wrong in my original note as they went via an agent in Italy back to Goiot in France. I would suggest that you contact Goiot direct - mine were expensive though! |
- Threads : 1702
- Posts : 10217
- Members: 820
- Online Members: 1